New Age Auto Painting Blog · July 28, 2026
Car Scratch Repair Before After Results Explained
See what car scratch repair before after results can reveal about paint depth, repair methods, color matching, and when Lakeland drivers need a body shop.
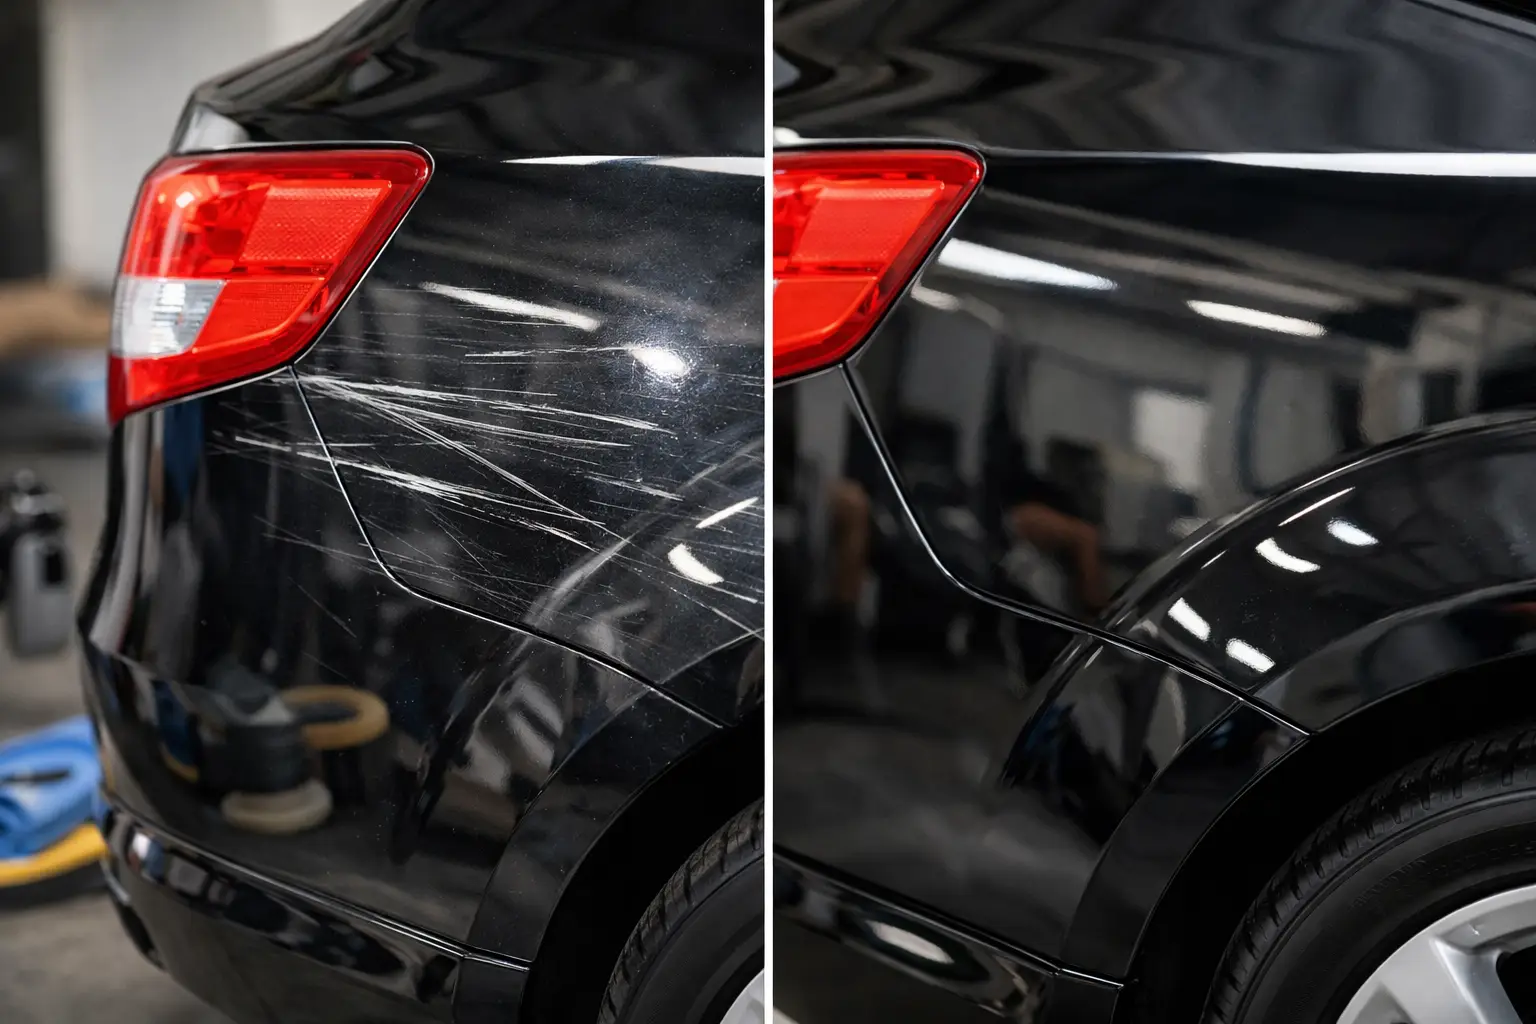
A car scratch can look minor in a parking lot and much worse after a wash or under direct Florida sun. Looking at car scratch repair before after results helps explain why some marks disappear with polishing while others require paintwork, panel repair, or a larger refinishing process. The visible line is only part of the damage. What matters is how far it extends through the vehicle’s finish and whether the underlying panel has been affected.
For Lakeland drivers, the goal is not simply to make a scratch less noticeable. Professional repair should restore a clean appearance while protecting the panel from corrosion, paint failure, and a mismatched finish that stands out later.
What Car Scratch Repair Before After Photos Can Show
Before-and-after photos can be useful, but they do not tell the whole story. A strong result usually shows more than a missing scratch. It shows a consistent paint gloss, an even color match, and no visible edges around the repaired area. On a properly refinished panel, the repair should blend with the surrounding finish rather than looking like a separate patch.
The "before" image may show a scuff from another vehicle’s paint, a key mark, a scrape from a shopping cart, or damage from brushing a garage wall. These causes can look similar at first. The repair method changes significantly based on the depth of the mark.
A surface scuff may be transferred paint sitting on top of the clear coat. In some cases, careful cleaning, compounding, and polishing can remove it without adding paint. A deeper scratch that has cut through the clear coat and color coat cannot be polished away. Trying to aggressively buff it can thin the surrounding finish and make the problem worse.
The Paint Layers Determine the Repair
Modern automotive paint is built in layers. The clear coat provides gloss and protection. Beneath it is the color coat, followed by primer and the metal or plastic panel itself. A scratch can stop at any of these points.
Clear-Coat Scratches
Clear-coat scratches are often light, hazy, and difficult to feel with a fingernail. Swirl marks from improper washing and minor scuffs commonly fall into this category. A technician may be able to correct these defects through machine polishing and finishing work. The before-and-after difference can be dramatic because the original paint remains in place.
Even this type of repair requires judgment. Heavy polishing may improve one defect while reducing clear-coat thickness in the area. A professional evaluates the finish before deciding how much correction is appropriate.
Color-Coat and Primer Damage
If the scratch catches a fingernail, shows a different color beneath the surface, or exposes a gray, white, or dark layer, it likely reaches beyond the clear coat. These scratches generally need paint repair. The damaged area may be sanded, primed if necessary, color matched, painted, clear coated, and blended into the adjacent panel area.
The after result depends on preparation as much as paint application. Skipping proper sanding or priming can lead to visible repair lines, poor adhesion, and early peeling. This is why a quick touch-up may be suitable for a very small chip but is not always the right answer for a long or highly visible scratch.
Exposed Metal, Plastic, or Damaged Panels
A scratch that exposes bare metal needs prompt attention. Florida heat, rain, and humidity can accelerate corrosion once the protective finish is breached. Rust can spread below the paint, turning a narrow scratch into a larger repair later.
On plastic bumpers, there is no rust concern, but the panel can still be gouged, cracked, or distorted. If a scrape includes a dent, crease, loose bumper cover, or broken mounting point, the vehicle may need auto body repair before any refinishing begins. Paint cannot hide an uneven surface.
What Happens During a Professional Scratch Repair
A reliable repair starts with an inspection under good lighting. The technician checks the damage from multiple angles, feels the surface, identifies paint transfer, and looks for adjacent dents or panel movement. Color code information is useful, but it is not the only factor. Age, sun exposure, previous repairs, and the paint’s condition can alter how the factory color appears on the vehicle.
For damage that needs refinishing, the process often includes cleaning the panel, sanding the damaged area, repairing minor imperfections, applying primer when needed, and preparing the surface for paint. The color is then mixed and tested for an appropriate match. Depending on the location and paint type, the repair may require blending color into nearby areas to prevent a noticeable change from the repaired spot to the original finish.
Clear coat is applied to create protection and gloss. After proper curing, the panel may receive final denibbing, polishing, and quality checks. The finished result should look consistent in shade, texture, and shine under normal viewing conditions.
This is the difference between covering a scratch and restoring a panel. The first may be fast, but the second is designed to hold up over time.
Why Some Before-and-After Results Look Better Than Others
Not every scratch repair has the same scope, and a responsible shop should be clear about the expected outcome. Several factors affect what can be achieved.
Metallic, pearl, tri-coat, and heavily faded colors are more challenging than a solid black, white, or gray finish. Metallic particles must be sprayed evenly to avoid blotchy areas. Pearl finishes can shift in appearance depending on spray technique and lighting. A repair that looks excellent in the shop can reveal a slight variation outdoors if color matching and blending were not handled carefully.
Panel location matters too. A scratch low on a bumper may allow for a more contained repair than one in the center of a door or across a body line. Damage that crosses multiple panels often requires a broader refinishing approach. The cost and repair time can increase, but so can the quality and durability of the final appearance.
Previous paintwork is another variable. If a panel has been repaired before, its paint thickness, condition, and color may differ from the rest of the vehicle. A technician needs to account for that before beginning work.
When a Scratch May Be Part of Collision Damage
A scrape from a low-speed impact can hide more than cosmetic damage. A bumper may have shifted out of alignment, a fender may be pushed inward, or a door edge may no longer close correctly. If the impact involved another vehicle, a pole, or a curb, check for changes in panel gaps, loose trim, damaged lights, or cracks around the impact area.
These issues are worth addressing before paint restoration. A vehicle can look better after a spot repair yet still have damaged components underneath. For larger damage, collision repair and bodywork should restore panel fit and structure first, followed by refinishing.
New Age Auto Painting serves Lakeland vehicle owners who need those services handled in one place, from body repair through professional automotive painting. That approach helps prevent a situation where cosmetic paint is applied before the underlying damage has been corrected.
Choosing Between Polishing, Touch-Up, and Refinishing
The best repair is the one that matches the damage and your expectations for the vehicle. Polishing is often a practical choice for light clear-coat defects. Touch-up paint can help protect a very small chip or reduce the appearance of a narrow mark, especially on an older daily driver. It may still remain visible up close.
Panel refinishing is generally the better option when the scratch is through the paint, located in a prominent area, or accompanied by denting and gouging. It requires more labor and materials, but it provides a more complete result when done correctly. For late-model vehicles, leased vehicles, or cars being prepared for sale, a professional repair can also help preserve appearance and avoid a distracting visible defect.
Do not judge the repair only by the closest possible inspection. Step back several feet, view it in daylight, and look along the panel at different angles. The finish should look natural in the same conditions where the scratch was most noticeable.
Protect the Repair After It Is Complete
Freshly repaired paint needs sensible care. Follow the shop’s instructions on washing, waxing, and when to use automated car washes. Avoid harsh chemicals and abrasive brushes, especially during the initial curing period. Regular hand washing with clean mitts and proper drying methods can reduce the new swirl marks that often make dark-colored vehicles look scratched again.
If you are unsure whether a mark will polish out or needs paintwork, avoid rubbing it repeatedly with household cleaners or aggressive compounds. A quick professional assessment can identify the paint layer involved and set realistic expectations before a small scratch becomes a larger finish problem.